Shopify is one of the most popular e-commerce platforms on the market, offering a range of features and tools for building and managing an online store. One of the ways in which Shopify stands out is through its flexibility and customizability, allowing store owners to create a unique look and feel for their store. One of the key tools for achieving this is custom CSS, which allows users to add their own code to modify the appearance and behavior of their store. In this blog post, we’ll explain what custom CSS is, why it’s important, and provide step-by-step instructions for adding custom CSS to your Shopify store.
What is Custom CSS in Shopify?
Custom CSS is a way of adding your own code to modify the appearance and behavior of your Shopify store. CSS stands for Cascading Style Sheets, which is a language used to describe how HTML elements should be displayed on a web page. By adding your own CSS code to your Shopify store, you can customize the look and feel of your store to create a unique and branded experience for your customers.
Why is Custom CSS Important?
Custom CSS is important for several reasons:
- Customization: Custom CSS allows you to customize the appearance and behavior of your store beyond what is possible with the built-in Shopify customization options. This can help you create a unique and branded experience for your customers.
- Flexibility: Custom CSS gives you the flexibility to make changes to your store quickly and easily, without having to rely on a developer or designer.
- Improved User Experience: Custom CSS can help to improve the user experience of your store by optimizing the layout, fonts, and colors to better reflect your brand and make it easier for customers to navigate and interact with your site.
How to Add Custom CSS to Shopify
Adding custom CSS to your Shopify store is a relatively simple process. Here’s a step-by-step guide:
Step 1: Log in to your Shopify account and navigate to the “Online Store” section of the admin panel
Step 2: Click on “Themes“
Step 3: Click on Customize
Step 4: Click Theme settings
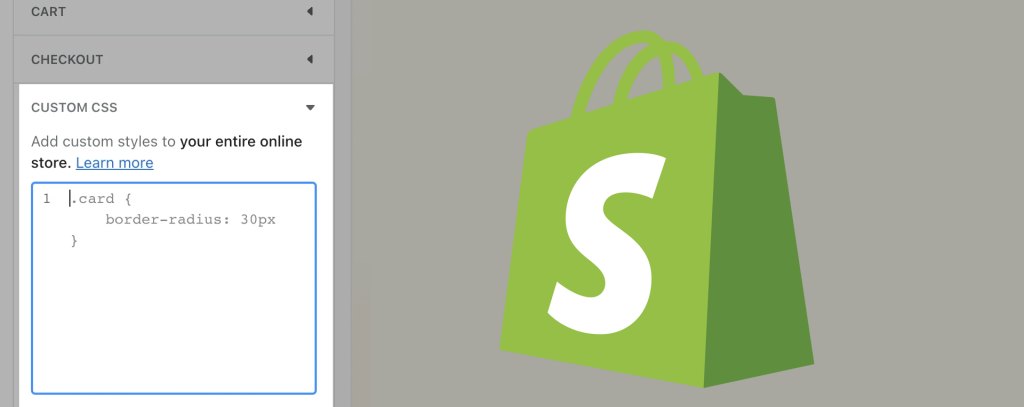
Step 5: Click on Custom CSS
Step 6: Add your code and click Save
Tips for Adding Custom CSS to Shopify
Here are some tips for adding custom CSS to your Shopify store:
- Use a Code Editor: To make it easier to write and edit your CSS code, use a code editor such as Atom or Sublime Text. These editors provide syntax highlighting, auto-completion, and other features that can help you write cleaner and more efficient code.
- Use a Child Theme: If you’re making extensive modifications to your theme, it’s a good idea to use a child theme. This is a separate theme that inherits the styles and functionality of the parent theme, but allows you to make customizations without affecting the parent theme.
- Test Your Code: Before making your custom CSS code live, make sure to test it thoroughly on a staging site or a local development environment. This can help you identify any issues or conflicts that might arise when the code is applied to your live site.
Conclusion
Custom CSS is a powerful tool for customizing the appearance and behavior of your Shopify store. By following the steps outlined in this post, you can easily add your own CSS code to your store and create a unique and branded experience for your customers. Remember to test your code thoroughly before making it live, and use a child theme if you’re making extensive modifications to your theme. With a bit of practice and experimentation, you can use custom CSS to take your Shopify store to the next level and stand out from the competition.