In WordPress, a custom post type is a content type that you can create and manage just like regular posts and pages. The difference is that custom post types allow you to create content that is tailored to your specific needs. For example, if you run a website for a real estate business, you might create a custom post type for “properties” that includes fields for property size, price, and location. This way, you can easily add and manage your property listings without having to use the default “posts” or “pages” content types.
Custom post types are a powerful tool for organizing your content and making it easier for your readers to find what they’re looking for. They allow you to create content that is unique to your website and can help you deliver a more engaging user experience. For example, you might use custom post types to create a portfolio of your work, a directory of staff members, or a collection of recipes. The possibilities are endless, and custom post types give you the flexibility to create content that fits your needs. In this article, we’ll walk through the steps to create a custom post type in WordPress.
Step 1: Plan Your Custom Post Type
Before you begin, it’s important to determine what type of content you want to create a custom post type for. This could be anything from a portfolio of your work to a library of articles, or even a directory of staff members. Once you have determined your content type, think about the custom fields and taxonomies that you want to associate with it. This will help you plan the structure of your custom post type.
Step 2: Register Your Custom Post Type
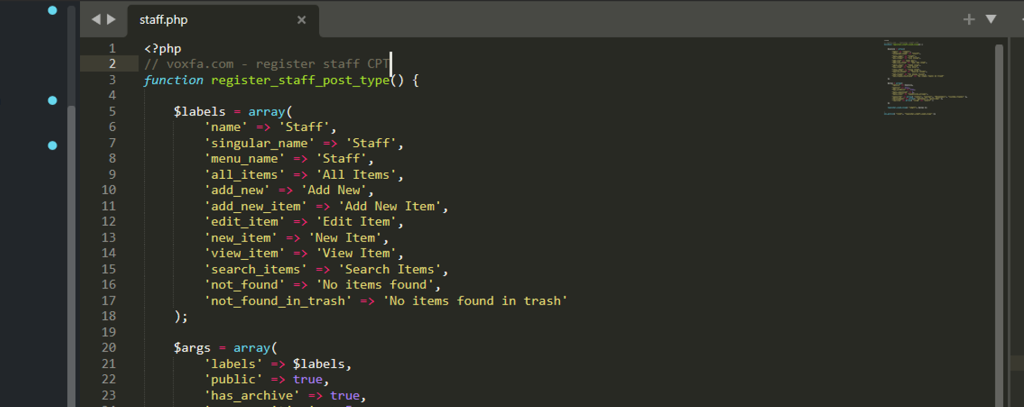
To register a custom post type, you’ll need to add some code to your functions.php file. You can do this by going to Appearance > Theme Editor in your WordPress dashboard and selecting functions.php. Here’s an example of what the code might look like:
function register_staff_post_type() {

    $labels = array(
        'name' => 'Staff',
        'singular_name' => 'Staff',
        'menu_name' => 'Staff',
        'all_items' => 'All Items',
        'add_new' => 'Add New',
        'add_new_item' => 'Add New Item',
        'edit_item' => 'Edit Item',
        'new_item' => 'New Item',
        'view_item' => 'View Item',
        'search_items' => 'Search Items',
        'not_found' => 'No items found',
        'not_found_in_trash' => 'No items found in trash'
    );

    $args = array(
        'labels' => $labels,
        'public' => true,
        'has_archive' => true,
        'menu_position' => 5,
        'menu_icon' => 'dashicons-groups',
        'supports' => array( 'title', 'editor', 'thumbnail', 'custom-fields' ),
        'taxonomies' => array( 'category', 'post_tag' ),
        'rewrite' => array( 'slug' => 'staff' )
    );

    register_post_type( 'staff', $args );

}
add_action( 'init', 'register_staff_post_type' );
This code creates a custom post type called “Staff” with some basic labels and settings. You can customize the labels, icons, and other settings to fit your needs.
Creating a custom post type in WordPress can help you organize your content and make it easier for your readers to find what they’re looking for. By following the steps outlined in this article, you can create a custom post type. With a little creativity, you can use custom post types to create a wide range of content types and deliver a more engaging user experience to your visitors.